세상사는 이야기 / 도움이 되었다면 배너 클릭 부탁드려요~ →→→

2018년 12월 19일 수요일

[Unity Error] The associated script cannot be loaded, please fix any compile errors and assign a valid script.

[Unity Error] The associated script cannot be loaded, please fix any compile errors and assign a valid script.

Visual Studio나 Console에서는 에러 내용이 없는데 Editor에서 Play하면
특정 컴퓨터에서 Complie error 발생
- Window 7 64bit


이유를 설명할수 없지만 나의 경우는 visual studio 업데이트로 해결하였다.

아래처럼 해보면 된다.
- visual studio installer로 visual studio 업데이트
- 프로젝트 내 라이브러리 폴더 삭제
- Unity 다시 실행

2018년 12월 17일 월요일

[Unity Android] Unity 2018.3 마이그레이션 Firebase.Editor.dll error

Unity 2018.3.0f 마이그레이션 Firebase.Editor.dll error

Unity 2018.2 -> 2018.3.0으로 버전을 업. 에러 발생
Assembly 'Assets/Firebase/Editor/Firebase.Editor.dll' will not be loaded due to errors: Unable to resolve reference 'Unity.iOS.Extensions.Xcode'. Is the assembly missing or incompatible with the current platform?


- 사용중인 Firebase 버전 5.2.1

공식 홈페이지확인 결과
5.3.1에서 해당사항이 수정되었다.


Firebase 버전 업~ 패키지 설치 후
- Android Resolver


2018년 11월 1일 목요일

[Unity Android] Facebook sdk "keytool not find"

Facebook Unity Plugin "keytool not find"

Program Files에 설치 되어있는 Java jre파일 확인
"C:\Program Files\Java\jre1.8.0_19\bin"

환경변수 -> Path에 설치 되어있는 jre의 bin폴더 추가


2018년 9월 13일 목요일

[Unity Android] Android 언어별 Appicon, App이름 변경

[Unity Android]  언어별 Appicon, 이름 변경
언어별로 icon과 앱이름을 변경과정을 정리하였다.

1. 언어별 AppIcon 설정
Plugs/Android/res폴더 아래
사용할 Icon을 국가, 사이즈 별로 폴더에 넣는다.
(mipmap 추가)

  • ldpi (저밀도) ~120dpi : 36x36 (0.75x)
  • mdpi (중간 밀도) ~160dpi : 48x48 (1.0x 기준)
  • hdpi (고밀도) ~240dpi : 72x72 (1.5x)
  • xhdpi (초고밀도) ~320dpi : 96x96 (2.0x)
  • xxhdpi (초초고밀도) ~480dpi : 144x144 (3.0x)
  • xxxhdpi (초초초고밀도) ~640dpi : 192x192 (4.0x)
    (런처 아이콘에만 해당, 위의 참고 참조)


확인 방법
시스템 언어를 한국어로 설정했을 경우
[환경설정] -> [언어 및 키보드] -> [언어 선택] -> 언어 변경


2. 언어별 AppName 설정
Plugs/Android/res폴더 아래
values-[언어코드] 아래 strings.xml 파일을 수정한다.

values : 디폴트
values-ko : 한국어
values-ja : 일본어
values-zh : 중국어

  • res/values-ko/strings.xml 한글
    • xml 인코딩 주의! UTF-8(+)로 저장
  • res/values-zh-rCN/strings.xml 중국어 간체
  • res/values-zh-rTW/strings.xml 중국어 번체


주요 해상도별 대표 디바이스 화면 크기
ldpi(120dpi /기타 소형단말기) : 240 x 320
mdpi(160dpi/G1, 옵티머스원): 320 x 480
mdpi(160dpi/G1, 갤럭시 탭 7.0,):600 x 1024
mdpi(160dpi/G1, 모토롤라 Xoom 10,갤럭시탭 7.7 & 10.1):1280 x 800
hdpi(240dpi / 갤럭시 S/S2) : 480 x 800
hdpi(240dpi / 모토로라 드로이드, XPERIA X10) : 480 x 854
xhdpi(320dpi / 갤럭시 S3/노트II ) : 720 x 1280
xhdpi(320dpi / 삼성 갤럭시 넥서스 ) : 720 x 1194 or 1280
xhdpi(320dpi / 삼성 갤럭시 노트I : 800 x 1280
xhdpi(320dpi / LG 옵티머스G, 넥서스4) : 768 x 1280
xxhdpi(480dpi / 갤럭시 S4 & 옵티머스G프로) : 1080×1920
xxxhdpi(640dpi / LG G3) : 1440×2560

mdpi 는 기준 밀도입니다. mdpi 에서1 px 는 1 dip 와 같습니다. 비율은 아래 표를 참고하세요.
ldpi | mdpi | tvdpi | hdpi | xhdpi | xxhdpi | xxxhdpi
0.75 | 1    | 1.33  | 1.5  | 2     | 3      | 4

아이콘 크기는 아래 표를 참고하세요.
ldpi    | mdpi    | tvdpi    | hdpi    | xhdpi     | xxhdpi    | xxxhdpi
36 x 36 | 48 x 48 | 64 x 64  | 72 x 72 | 96 x 96   | 144 x 144 | 192 x 192

픽셀 밀도는 아래 표를 참고하세요.
ldpi  | mdpi  | tvdpi  | hdpi  | xhdpi  | xxhdpi  | xxxhdpi
120   | 160   | 213    | 240   | 320    | 480     | 640
참고 링크
http://egloos.zum.com/sweeper/v/3189739
http://limchaeng.tistory.com/24

2018년 9월 10일 월요일

[Unity] Api Compatibility Level .Net 4.x 가 보이지 않을때


Unity  Api Compatibility Level .Net 4.x 가 보이지 않을때

Project Setting -> Scripting Runtime Version .Net 4.x -> Api Compatibility Level .Net 4.x 가 보이지 않을때 

.Net Framework 4.x 버전이 설치 되어 있지 않으면 보이지 않는다.
Viausl Studio Installer 실행 ->사용할 net Framework 설치

수정 -> 개별구성요소 ->".Net Framework 4.6 타기팅 팩" 체크 설치

Project Setting -> Scripting Runtime Version .Net 4.x -> Api Compatibility Level .Net 4.x 선택


.net 4.x 기능들

[Unity] Firebase 설치시 Net4.x 에러

Firebase 버전을 올리고 아래 에러가 발생했다.


error CS0012: The type `System.Threading.Tasks.Task' is defined in an assembly that is not referenced. Consider adding a reference to assembly

Firebase 설명 문서에 나와있듯 SDK 내에는 Unity.Tasks.dll, Unity.Compat.dll 두개의 파일은 Net 4.5버전과 다른버전 2가지를 모두 가지고있다.
둘중 하나를 지워주면 수정된다.


알려진 문제
Unity 2017.x .NET 4.x 프로젝트에 플러그인 설치
.NET 4.x 지원은 Unity 2017 이상 버전의 시험용 빌드 옵션으로 제공됩니다. 이전 버전의 .NET에서는 Firebase 플러그인이 Parse SDK 구성요소를 사용해 일부 .NET 4.x 클래스를 제공합니다. 따라서 Firebase를 .NET 4.x 지원 프로젝트로 가져올 경우 Parse SDK로 구현된 일부 .NET 4.x 프레임워크 유형에서 컴파일 오류가 발생할 수 있습니다.
컴파일 오류 해결 방법은 다음과 같습니다.
모든 플랫폼에서 다음 DLL을 삭제하거나 사용 중지합니다.
모든 플랫폼에서 다음 DLL을 사용 설정합니다.
  • Parse/Plugins/dotNet45/Unity.Compat.dll
  • Parse/Plugins/dotNet45/Unity.Tasks.dll
다른 Firebase 플러그인을 가져오는 경우
메뉴 항목 Assets > Play Services Resolver > Version Handler > Update 를 선택해 .NET 4.x DLL을 다시 사용 설정하고 .NET 3.x DLL을 사용 중지합니다.


Update 하지 않으면 아래 에러

error CS0012: The type `System.Threading.Tasks.Task`1<Firebase.DependencyStatus>' is defined in an assembly that is not referenced. Consider adding a reference to assembly `Unity.Tasks, Version=0.0.0.0, Culture=neutral, PublicKeyToken=null'


2018년 8월 29일 수요일

[Unity] ML-Agent 설치 및 실행

Unity Machine Learning Day 다녀오고 ML-Agent에 관심이 생겨 설치 과정을 정리해보았다.

ML-Agents
https://github.com/Unity-Technologies/ml-agents

Window 설치 문서
https://github.com/Unity-Technologies/ml-agents/blob/master/docs/Installation-Windows.md


이문서는 Window환경을 기준으로 했으며,
Anaconda를 사용하면 Python의 다양한 배포판에 대해 별도의 환경을 관리 할 수 ​​있다.

1. Anaconda 버전 5.1 설치


1-1. Regster Anaconda my default Pythone 3.6 선택


2. 환경변수를 등록

  1. “시스템 속성” -> “환경변수” 클릭
  2. “환경변수” -> “시스템 변수” -> “Path” 더블 클릭
  3. “환경 변수 편집” -> “새로 만들기“ 아래 4가지 추가
설치 폴더를 확인 (C:\ProgramData) 하고 추가해준다.
문서에서는 아래 폴더(UserProfile)로 되어있다.

C:\ProgramData\Anaconda3\Scripts
C:\ProgramData\Anaconda3\Scripts\conda.exe
C:\ProgramData\Anaconda3
C:\ProgramData\Anaconda3\python.exe
%UserProfile%\Anaconda3\Scripts
%UserProfile%\Anaconda3\Scripts\conda.exe
%UserProfile%\Anaconda3
%UserProfile%\Anaconda3\python.exe


3. Conda 환경 설정 및 ml-agents 활성화

  1. ML-Agents 툴킷을 사용할 Conda 환경을 생성한다. 생성한 Conda 환경에서 설치한 패키지는 Python이나 다른 환경의 다른 설치에는 영향을 미치지 않는다.
ML-Agents를 실행하려면 생성한 Conda 환경을 활성화 해야한다.
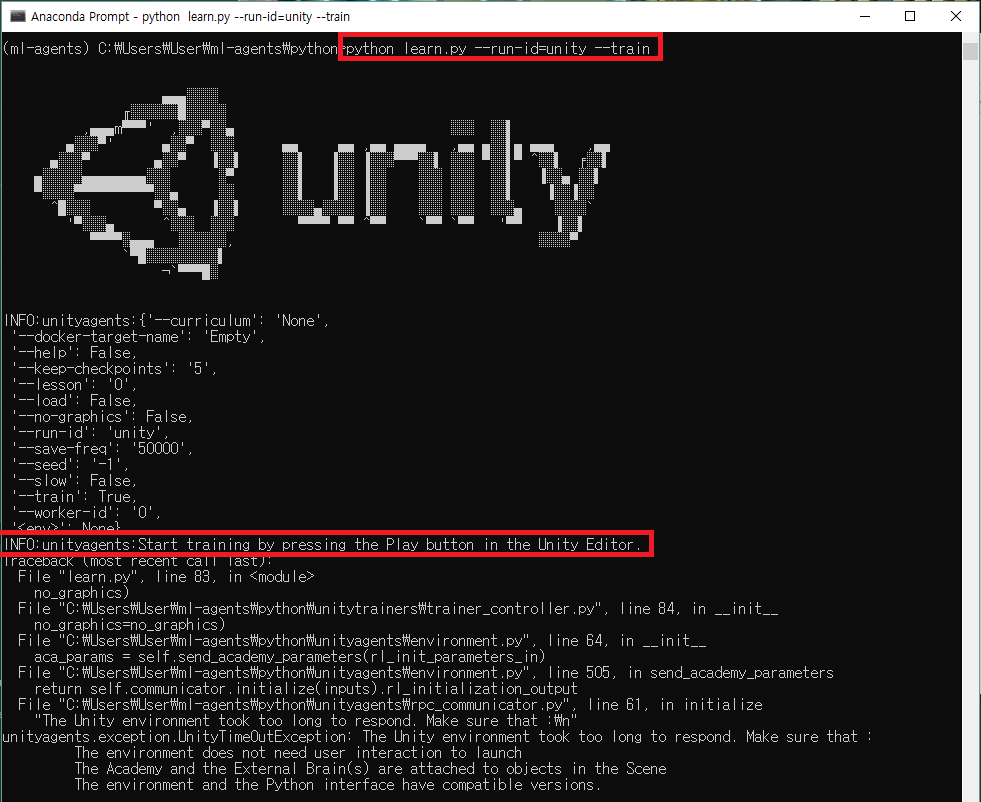
새로운 Conda 환경을 만들려면 Anaconda Prompt 창을 열고 다음 명령을 입력
    • conda create -n ml-agents python=3.6

2. ml-agents 활성화
    • activate ml-agents
3. tensorflow install
    • pip install tensorflow==1.7.1

4. ML-Agents Toolkit에서 사용하는 Python패키지 설치

- Git을 이용한 설치
  1.  필수 패키지 설치를 위해서는 Git을 설치( 다운로드 Git 설치 후 Anaconda Prompt 실행
    • 새창으로 시작할 경우 ml-agents를 활성화해야 함 : activate ml-agents
  2. ML-Agents Toolkit Github 저장소 Clone
    • git clone https://github.com/Unity-Technologies/ml-agents.git

- Git을 사용하지 않을 경우
  1. ml-agents-master.zip파일 다운로드(링크)
  2. C:\Downloads  폴더에 복사 압축 해제
  3. Anaconda Prompt에서 ml-agents 디렉토리 내의 python 디렉토리로 변경
    • cd C:\Downloads\ml-agents\python
  4. 인터넷에 연결되어 있는 상태에서 Anaconda Prompt 입력
    • pip install


ML-Agents 툴킷을 실행하는 데 필요한 모든 Python 패키지의 설치가 완료


5. 실행

  1. Terminal창(Anaconda)에서 실행(python3 아님)
    • python learn.py --run-id=<run-identifier> --train
    • “Start training by pressing the Play button in the Unity Editor" 메시지  출력 후
  2.  Unity 에서 재생(Play) 버튼 클릭하면 ML-Agent와 Python이 통신하면서 모델(데이터)을 저장한다.


실행시 에러 모음

2018년 8월 17일 금요일

[Android] Nox Player가 Logcat과 연결이 안될때

Nox Player가 Logcat과 연결이 안될때가 많다.

아래내용를 Batch파일로 만들어서 사용하면 편한다.
txt파일 생성 -> 아래내용 입력 -> 확장자 bat로 수정


"C:\Program Files\Nox\bin\adb.exe" devices
"C:\Program Files\Nox\bin\adb.exe" connect 127.0.0.1:62001

다운로드

[Android] CMS 콘솔창으로 LogCat 보기


Batch파일을 이용해 CMS 콘솔창으로 LogCat 볼수있다.
txt파일 생성 -> 파일편집 -> 확장자를 bat로 수정

1. 모든 로그 보기
2. Unity 관련 로그 보기
3. Unity 에서 사용한 Debug.Log만 보기

@echo off
:Ask
echo LogCat을 선택하세요?(1, 2, 3)
echo 1. LogCat 모두 보이게
echo 2. Unity 관련 Log 다 보이게
echo 3. Unity에서 사용한 Log만 보이게
set INPUT=
set /P INPUT=LogCat Type input :
If %INPUT%==1 goto all
If %INPUT%==2 goto unityall
If %INPUT%==3 goto unltylog
:all
echo 1
C:\Users\%USERNAME%\AppData\Local\Android\Sdk\platform-tools\adb logcat
goto exit
:unityall
echo 2
C:\Users\%USERNAME%\AppData\Local\Android\Sdk\platform-tools\adb logcat -s Unity
goto exit
:unltylog
echo 3
C:\Users\%USERNAME%\AppData\Local\Android\Sdk\platform-tools\adb logcat Unity:I Native:I *:S
goto exit
:exit
@pause

2018년 8월 16일 목요일

[Unity Android] Unity 2018.2 GooglePlayGamesPlugin-0.9.50 Crash

Unity 2018.2버전으로 마이그래이션 후 playgameservices 로그인이 안되면서 Crash가 발생
- Google Play Games plugin for Unity 0.9.50 기준

Social.localUser.Authenticate 구글 플레이 게임 서비스 호출 -> Crash

Caused by: java.lang.IllegalStateException: A fatal developer error has occurred. Check the logs for further information.

구글 플레이 게임 서비스의 app_id의 읽는 구조가 2018.2에서 변경되었다.
Unity Android 빌드 시 AndroidManifest.xml 병합 과정에서 개행문자 인식 오류로 인해 App_ID부분을 인식 하지 못한다.


해결 방법

아래 파일을 열어 app_id 앞의 여백에 "u003"을 입력한다.
Assets/GooglePlayGames/Editor/template-AndroidManifest.txt

<meta-data android:name="com.google.android.gms.games.APP_ID"
            android:value="\ __APP_ID__" />

->

<meta-data android:name="com.google.android.gms.games.APP_ID"
            android:value="\u003__APP_ID__" />
Google Play Games - Android Configuration -> Setup


아래 파일 확인 (위에것 말고 아래것만 수정해도 된다.)
GooglePlayGames/Plugins/Android/GooglePlayGamesManifest.plugin/AndroidManifest.xml

<meta-data android:name="com.google.android.gms.games.APP_ID" android:value="\ 123456789" />

->

<meta-data android:name="com.google.android.gms.games.APP_ID" android:value="\u003123456789" />

Open found in 
  and replace all instances of "\ " (note the trailing space after the slash) with "\u003". Worked for me on 2018.2.1f1.


[Unity Android] GPGS & Firebase : GamesNativeSDK Can't Register class Error

Google Play Game Service & Firebase Error

실행 환경
play-games-plugin-for-unity-0.9.50
firebase_unity_sdk_5.2.0
  - FirebaseMessaging.unitypackage 설치

DEX64 및 여러 빌드 에러를 다 잡고 APK를 만들어 실행하였다.
게임 실행중 아래 에러가 발생 하며, Google Play Game Service에 로그인이 되지 않았다.
Asset/Plugins/Android폴더의 play-services-auth 버전확인 결과 사용 하려는 버전 보다 낮은 aar파일이 받아지는것을 확인하였다.
해당내용은 FireBase Plugin에서 Appdependencies.xml파일을 수정하면 된다.

Assets/FireBase/Editor/Appdependencies.xml
androidPackage com.google.android.gms:play-services-base 삭제
<!-- Copyright (C) 2018 Google Inc. All Rights Reserved.

FirebaseApp iOS and Android Dependencies.
-->

<dependencies>
  <iosPods>
    <iosPod name="Firebase/Core" version="5.4.0" minTargetSdk="8.0">
    </iosPod>
  </iosPods>
  <androidPackages>
      <!--  삭제
    <androidPackage spec="com.google.android.gms:play-services-base:15.0.1">
    </androidPackage>
    -->
    <androidPackage spec="com.google.firebase:firebase-common:16.0.0">
    </androidPackage>
    <androidPackage spec="com.google.firebase:firebase-core:16.0.1">
    </androidPackage>
    <androidPackage spec="com.google.firebase:firebase-app-unity:5.2.0">
      <repositories>
        <repository>Assets/Firebase/m2repository</repository>
      </repositories>
    </androidPackage>
  </androidPackages>
</dependencies>


androidPackage com.google.android.gms:play-services-base 삭제하면 Editor에서 aar파일을 15.0.1 버전으로 다시 받는다.


참고 링크
GPGS & Firebase : GamesNativeSDK Can't Register class Error #2230

Mixed dependency versions resolve incorrectly. #123

Does not bump pre-15 versions to 15+ #127

// 버그 해결책
Mixed Dependency Versions bugs 2.0 #130


2018년 8월 10일 금요일

[Unity Android] Failed to execute aapt

FireBase 작업중 갑자기 없던 에러가 발생
검색결과 다시 빌드 하라는 말만..

해결
라이브러리를 찾지 못해서 발생
Menu Asset -> Play Services Resolver -> Android Resolver를 다시 실행해서 라이브러리를 다시 받는다.


[Unity Android] Gradle Minify을 이용한 Dex 64k 참조 제한 해결 방법 정리

앞에 두번의 글을 적었는데 유니티의 더 좋은 기능이 있어서 다시 소개한다.
아직 실험단계(Experimental)의 기능이라서 그런지 설명이 없다...

발생 원인은 아래 링크 참고
https://developer.android.com/studio/build/multidex
두 오류 모두 공통 숫자인 65,536을 표시합니다. 이 숫자는 단일 DEX(Dalvik Executable) 바이트코드 파일 내에서 코드가 호출할 수 있는 참조의 총 개수를 나타냅니다. 이 페이지에서는 multidex라는 앱 구성을 활성화하여 이 제한을 넘는 방법을 설명합니다. multidex는 앱이 다중 DEX 파일을 빌드하고 읽을 수 있게 해줍니다.

64K 에러 메시지들
Conversion to Dalvik format failed:
Unable to execute dex: method ID not in [0, 0xffff]: 65536
trouble writing output:
Too many field references: 131000; max is 65536.
You may try using --multi-dex option.
Error:The number of method references in a .dex file cannot exceed 64K.
Error:Execution failed for task ':app:transformClassesWithDexForRelease'.

해결 방법
간단하다. 클릭 두번이면 끝...
  1. Build System -> Gradle 선택
  2. PlayerSettings -> Publishing Settings -> Minify -> Release/Debug -> Gradle(Experimental) 선택 (ProGuard를 선택해도 된다.)
끝...

AndroidManifest에 android:name="android.support.multidex.MultiDexApplication" 확인 후 삭제


다른 방법


2018년 8월 9일 목요일

[Unity Android] Gradle Build에서 FireBase 사용하기 google-services.json is missing

다른 테스트중 아래 내용이 다를수도 있다.


Unity에서 Gradle Build를 사용하여 FireBase를 추가할 경우 
아래 FireBase Android 문서를 보고 내용을 추가하면 여러~ 에러가 발생한다.
문서는 Android를 사용하는 방법이니... 
우리는 Unity!!! 문서 내용은 사용하지 않으며, 과감히 지운다.

delete
// classpath 'com.google.gms:google-services:4.0.1'
//implementation "com.google.firebase:firebase-core:16.0.1"

//implementation 'com.google.firebase:firebase-messaging:17.1.0'
// ADD THIS AT THE BOTTOM
//apply plugin: 'com.google.gms.google-services'


* What went wrong:
Execution failed for task ':processReleaseGoogleServices'.
> File google-services.json is missing. The Google Services Plugin cannot function without it.
   Searched Location:
  C:\WORKSPACE\kor\Temp\gradleOut\src\nullnull\release\google-services.json


[Unity Android] Gradle ProGuard을 이용한 Dex 64k 참조 제한 해결 방법 정리

글확인 전 아래링크부터 확인


Android 개발 빌드 64K 참조 제한 해결 방법에 대해 정리한다.(Unity 2018.2)

발생 원인은 아래 링크 참고
https://developer.android.com/studio/build/multidex
두 오류 모두 공통 숫자인 65,536을 표시합니다. 이 숫자는 단일 DEX(Dalvik Executable) 바이트코드 파일 내에서 코드가 호출할 수 있는 참조의 총 개수를 나타냅니다. 이 페이지에서는 multidex라는 앱 구성을 활성화하여 이 제한을 넘는 방법을 설명합니다. multidex는 앱이 다중 DEX 파일을 빌드하고 읽을 수 있게 해줍니다.

64K 에러 메시지들
Conversion to Dalvik format failed:
Unable to execute dex: method ID not in [0, 0xffff]: 65536
trouble writing output:
Too many field references: 131000; max is 65536.
You may try using --multi-dex option.
Error:The number of method references in a .dex file cannot exceed 64K.
Error:Execution failed for task ':app:transformClassesWithDexForRelease'.

해결 방법
64K 참조 제한의 해결 방법 아래 두가지가 있다
  1. Project  Export 후 Android Stdio에서 빌드
    1. https://developers.facebook.com/docs/audience-network/unity?locale=ko_KR
  1. mainTemplate.gradle
    1.  MultiDex 사용
      1. https://docs.toast.com/ko/Game/Gamebase/ko/unity-started/
    2. ProGuard를 이용한 방법
      1. https://developer.android.com/studio/build/shrink-code?hl=ko

1번 내용은 많기 때문에 유니티의 새로운 기능이며, 따로 Export하지 않아도 되는
2-2. ProGuard를 이용한 방법을 사용하겠다.

ProGuard를 사용하면 코드 난독화 / 최적화, 코드 축소를 통해 미사용 코드를 제거 하여 Dex64K를 해결 할 수 있다.


Custom Gradle template 사용
  1.  Build System -> Gradle 선택
  2.  mainTemplate.gradle 설정
  3.  Custom Gradle Template 설정
PlayerSettings -> Publishing Settings -> Build / Custom Gradle Template 체크 -> User Proguard File 체크


Plugins/Android폴더 아래 mainTemplate.gradle / proguard-user File 파일이 생긴다.


3. mainTemplate.gradle 파일


// GENERATED BY UNITY. REMOVE THIS COMMENT TO PREVENT OVERWRITING WHEN EXPORTING AGAIN
buildscript {
    repositories {
        jcenter()
    }

    dependencies {
        classpath 'com.android.tools.build:gradle:3.0.0'
    }
}

allprojects {
   repositories {
      flatDir {
        dirs 'libs'
      }
   }
}

apply plugin: 'com.android.application'

dependencies {
    compile fileTree(dir: 'libs', include: ['*.jar'])
**DEPS**}

android {
    compileSdkVersion **APIVERSION**
    buildToolsVersion '**BUILDTOOLS**'

    defaultConfig {
        minSdkVersion    **MINSDKVERSION**
        targetSdkVersion **TARGETSDKVERSION**
        applicationId '**APPLICATIONID**'
        multiDexEnabled true
        ndk {
            abiFilters **ABIFILTERS**
        }
        versionCode    **VERSIONCODE**
        versionName    '**VERSIONNAME**'
    }

    lintOptions {
        abortOnError false
    }

    aaptOptions {
        noCompress '.unity3d', '.ress', '.resource', '.obb'**STREAMING_ASSETS**
    }

**SIGN**
    buildTypes {
          debug {
            minifyEnabled **MINIFY_DEBUG**
            useProguard **PROGUARD_DEBUG**
            proguardFiles getDefaultProguardFile('proguard-android.txt'), 'proguard-unity.txt'**USER_PROGUARD**
              jniDebuggable true
          }
          release {
            minifyEnabled **MINIFY_RELEASE**
            useProguard **PROGUARD_RELEASE**
            proguardFiles getDefaultProguardFile('proguard-android.txt'), 'proguard-unity.txt'**USER_PROGUARD**
              **SIGNCONFIG**
          }
    }
**PACKAGING_OPTIONS**
}


**SOURCE_BUILD_SETUP**

4.proguard-user 파일

예제

# Begin: Debug ProGuard rules
-dontobfuscate

-keepattributes SoureFile,LineNumberTable

# End: Debug ProGuard rules

난독화 옵션
  • dontwarn 패키지명.** : 지정해서 경고 무시
  • keep class 패키지명.** : 난독화가 필요하지 않은 경우
         keep class com.example.classname : ClassNotFoundException에러나 난독화를 진행하지 않고 유지하는 옵션
  • ignorewarnings : 경고 무시
  • dontoptimize : 최적화 하지 않기
  • dontshrink : 사용하지 않는 메소드 유지
  • keepclassmembers : 특정 클래스 멤버 원상태 유지
        keepclassmembers class com.example.classname { 접근제어자 *; } : 특정 클래스의 맴버 원상태 유지
  • keepattributes : 내부 클래스 원상태 유지 적용
        keepattributes InnerClasses # 내부클래스 원상태 유지 적용

자세한 내용은 아래 링크 참조 

2018년 6월 26일 화요일

[Unity Android] NDK is missing a "platforms" directory.


Google Play Service설치 진행중 테스트 빌드 후 아래와 같은 에러가 발생 하였다.

NDK is missing a "platforms" directory.
If you are using NDK, verify the ndk.dir is set to a valid NDK directory. It is currently set to C:\Users\User\AppData\Local\Android\sdk\ndk-bundle.
If you are not using NDK, unset the NDK variable from ANDROID_NDK_HOME or local.properties to remove this warning.

원인
  1. 직접 NDK를 다운 받아서 설치 했다면 폴더 경로가 달라서 나오는 에러
해결
  1. 환경 변수(ANDROID_NDK_HOME)에 NDK Path 설치 경로를 등록해준다. 
  2. Android Studio에서 NDK를 받아서 사용하면 된다.

나는 2번 Android Studio를 이용하여 해당 에러를 수정하겠다.

1. Android Studio 실행 -> Tools -> SDK Manager

2. Android SDK -> SDK Tools -> NDK 체크 후 -> Apply

설치가 완료 되고 폴더를 확인해 보면 해당 NDK가 잘 설치되어있다.

C:\Users\User\AppData\Local\Android\sdk\ndk-bundle


에러 전문

[Unity Android] Gradle MultiDex을 이용한 Dex 64k 참조 제한 해결 방법 정리

글확인 전 아래링크부터 확인

Android 빌드 64K 참조 제한 해결 방법에 대해 정리한다.(Unity 2018.1)

발생 원인은 아래 링크 참고
https://developer.android.com/studio/build/multidex
두 오류 모두 공통 숫자인 65,536을 표시합니다. 이 숫자는 단일 DEX(Dalvik Executable) 바이트코드 파일 내에서 코드가 호출할 수 있는 참조의 총 개수를 나타냅니다. 이 페이지에서는 multidex라는 앱 구성을 활성화하여 이 제한을 넘는 방법을 설명합니다. multidex는 앱이 다중 DEX 파일을 빌드하고 읽을 수 있게 해줍니다.

64K 에러 메시지들
Conversion to Dalvik format failed:
Unable to execute dex: method ID not in [0, 0xffff]: 65536
trouble writing output:
Too many field references: 131000; max is 65536.
You may try using --multi-dex option.
Error:The number of method references in a .dex file cannot exceed 64K.
Error:Execution failed for task ':app:transformClassesWithDexForRelease'.

해결 방법
64K 참조 제한의 해결 방법 아래 두가지가 있다
  1. Project  Export 후 Android Stdio에서 빌드
    1. https://developers.facebook.com/docs/audience-network/unity?locale=ko_KR
  1. mainTemplate.gradle 
    1. MultiDex 사용
      1. https://medium.com/@abhpatidar/solving-unity-dex-issue-538e134c8809
    2. ProGuard를 이용한 방법
      1. https://www.androidhuman.com/lecture/proguard/2017/02/16/reduce-method-count-with-proguard/

1번 내용은 많기 때문에 유니티의 새로운 기능이며, 따로 Export 하지 않아도 되는 2-1 MultiDex 사용하겠다.


Custom Gradle template 사용하여 해결
  1.  Build System -> Gradle 선택
  2.  mainTemplate.gradle 파일 설정
PlayerSettings -> Publishing Settings -> Build / Custom Gradle Template 체크

Custom Gradle Template 체크하면 Plugins/Android폴더 아래 파일이 생긴다.

3. mainTemplate.gradle 파일 수정
     maintemplate.gradle 새로 정리된 링크

// GENERATED BY UNITY. REMOVE THIS COMMENT TO PREVENT OVERWRITING WHEN EXPORTING AGAIN
buildscript {
repositories {
jcenter()
maven { url "https://maven.google.com/"}
}

dependencies {
   classpath 'com.android.tools.build:gradle:2.3.0' // Unity 2018.1 : Gradle version 4.0.1    //classpath 'com.android.tools.build:gradle:3.0.1' // Unity 2018.2 : Gradle version 4.2.1
}
}

allprojects {
   repositories {
      jcenter()
      maven { url 'https://maven.google.com'}
      flatDir {
        dirs 'libs'
      }
   }
}

apply plugin: 'com.android.application'

dependencies {
    // PC에 설치 되어있는 버전을 사용(하단 그림)
    compile 'com.android.support:multidex:1.0.1'
    compile fileTree(dir: 'libs', include: ['*.jar'])
**DEPS**}

android {
    compileSdkVersion **APIVERSION**
    buildToolsVersion '**BUILDTOOLS**'

    defaultConfig {
        minSdkVersion    **MINSDKVERSION**
        targetSdkVersion **TARGETSDKVERSION**
        applicationId '**APPLICATIONID**'
        multiDexEnabled true
        ndk {
            abiFilters **ABIFILTERS**
        }
        versionCode    **VERSIONCODE**
        versionName    '**VERSIONNAME**'
    }
    dexOptions {
        javaMaxHeapSize "4g"
    }

    lintOptions {
        abortOnError false
    }

    aaptOptions {
        noCompress '.unity3d', '.ress', '.resource', '.obb'**STREAMING_ASSETS**
    }

**SIGN**
    buildTypes {
          debug {
            minifyEnabled **MINIFY_DEBUG**
            // 삭제 하지 않으면 에러 발생 
            useProguard **PROGUARD_DEBUG**      // 2018.2 수정
            proguardFiles getDefaultProguardFile('proguard-android.txt'), 'proguard-unity.txt'**USER_PROGUARD**
              jniDebuggable true
          }
          release {
            minifyEnabled **MINIFY_RELEASE**
            // 삭제 하지 않으면 에러 발생 
            useProguard **PROGUARD_RELEASE**     // 2018.2 수정
              proguardFiles getDefaultProguardFile('proguard-android.txt'), 'proguard-unity.txt'**USER_PROGUARD**
              **SIGNCONFIG**
          }
    }
**PACKAGING_OPTIONS**
}


**SOURCE_BUILD_SETUP**

필요 하다면 자신의 multidex 버전 확인
C:\Users\User\AppData\Local\Android\Sdk\extras\android\m2repository\com\android\support\multidex
  1. AndoidManidest.xml파일에 MultiDexApplication추가
    android:name="android.support.multidex.MultiDexApplication"
<application android:allowBackup="true" android:icon="@drawable/app_icon" android:label="@string/app_name" android:theme="@style/UnityThemeSelector" android:debuggable="false" android:isGame="false"
android:  -


추가 - 2019.07.25
- -https://today7e.blogspot.com/2019/07/unity-android-comandroidbuildapitransfo.html

Android Resolver 1.2.122 사용시 
mainTemplate.gradle이 아래와 같이 android.useAndroidX" true값이 들어가 있으면 빌드시 에러가 발생한다.
// Android Resolver Repos Start
([rootProject] + (rootProject.subprojects as List)).each {
    ext {
        it.setProperty("android.useAndroidX", true)
        it.setProperty("android.enableJetifier", true)
    }
}


그럴 경우 AndoidManidest.xml파일에 MultiDexApplication추가
  android:name="androidx.multidex.MultiDexApplication"