세상사는 이야기 / 도움이 되었다면 배너 클릭 부탁드려요~ →→→

2018년 6월 26일 화요일

[Unity Android] NDK is missing a "platforms" directory.


Google Play Service설치 진행중 테스트 빌드 후 아래와 같은 에러가 발생 하였다.

NDK is missing a "platforms" directory.
If you are using NDK, verify the ndk.dir is set to a valid NDK directory. It is currently set to C:\Users\User\AppData\Local\Android\sdk\ndk-bundle.
If you are not using NDK, unset the NDK variable from ANDROID_NDK_HOME or local.properties to remove this warning.

원인
  1. 직접 NDK를 다운 받아서 설치 했다면 폴더 경로가 달라서 나오는 에러
해결
  1. 환경 변수(ANDROID_NDK_HOME)에 NDK Path 설치 경로를 등록해준다. 
  2. Android Studio에서 NDK를 받아서 사용하면 된다.

나는 2번 Android Studio를 이용하여 해당 에러를 수정하겠다.

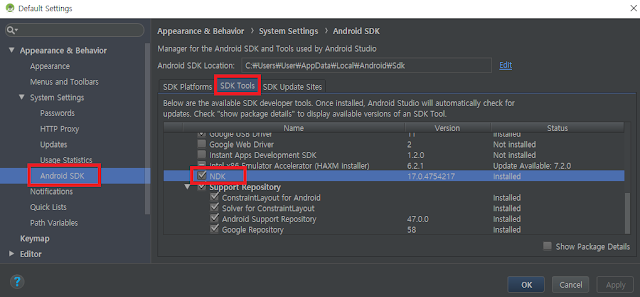
1. Android Studio 실행 -> Tools -> SDK Manager

2. Android SDK -> SDK Tools -> NDK 체크 후 -> Apply

설치가 완료 되고 폴더를 확인해 보면 해당 NDK가 잘 설치되어있다.

C:\Users\User\AppData\Local\Android\sdk\ndk-bundle


에러 전문

[Unity Android] Gradle MultiDex을 이용한 Dex 64k 참조 제한 해결 방법 정리

글확인 전 아래링크부터 확인

Android 빌드 64K 참조 제한 해결 방법에 대해 정리한다.(Unity 2018.1)

발생 원인은 아래 링크 참고
https://developer.android.com/studio/build/multidex
두 오류 모두 공통 숫자인 65,536을 표시합니다. 이 숫자는 단일 DEX(Dalvik Executable) 바이트코드 파일 내에서 코드가 호출할 수 있는 참조의 총 개수를 나타냅니다. 이 페이지에서는 multidex라는 앱 구성을 활성화하여 이 제한을 넘는 방법을 설명합니다. multidex는 앱이 다중 DEX 파일을 빌드하고 읽을 수 있게 해줍니다.

64K 에러 메시지들
Conversion to Dalvik format failed:
Unable to execute dex: method ID not in [0, 0xffff]: 65536
trouble writing output:
Too many field references: 131000; max is 65536.
You may try using --multi-dex option.
Error:The number of method references in a .dex file cannot exceed 64K.
Error:Execution failed for task ':app:transformClassesWithDexForRelease'.

해결 방법
64K 참조 제한의 해결 방법 아래 두가지가 있다
  1. Project  Export 후 Android Stdio에서 빌드
    1. https://developers.facebook.com/docs/audience-network/unity?locale=ko_KR
  1. mainTemplate.gradle 
    1. MultiDex 사용
      1. https://medium.com/@abhpatidar/solving-unity-dex-issue-538e134c8809
    2. ProGuard를 이용한 방법
      1. https://www.androidhuman.com/lecture/proguard/2017/02/16/reduce-method-count-with-proguard/

1번 내용은 많기 때문에 유니티의 새로운 기능이며, 따로 Export 하지 않아도 되는 2-1 MultiDex 사용하겠다.


Custom Gradle template 사용하여 해결
  1.  Build System -> Gradle 선택
  2.  mainTemplate.gradle 파일 설정
PlayerSettings -> Publishing Settings -> Build / Custom Gradle Template 체크

Custom Gradle Template 체크하면 Plugins/Android폴더 아래 파일이 생긴다.

3. mainTemplate.gradle 파일 수정
     maintemplate.gradle 새로 정리된 링크

// GENERATED BY UNITY. REMOVE THIS COMMENT TO PREVENT OVERWRITING WHEN EXPORTING AGAIN
buildscript {
repositories {
jcenter()
maven { url "https://maven.google.com/"}
}

dependencies {
   classpath 'com.android.tools.build:gradle:2.3.0' // Unity 2018.1 : Gradle version 4.0.1    //classpath 'com.android.tools.build:gradle:3.0.1' // Unity 2018.2 : Gradle version 4.2.1
}
}

allprojects {
   repositories {
      jcenter()
      maven { url 'https://maven.google.com'}
      flatDir {
        dirs 'libs'
      }
   }
}

apply plugin: 'com.android.application'

dependencies {
    // PC에 설치 되어있는 버전을 사용(하단 그림)
    compile 'com.android.support:multidex:1.0.1'
    compile fileTree(dir: 'libs', include: ['*.jar'])
**DEPS**}

android {
    compileSdkVersion **APIVERSION**
    buildToolsVersion '**BUILDTOOLS**'

    defaultConfig {
        minSdkVersion    **MINSDKVERSION**
        targetSdkVersion **TARGETSDKVERSION**
        applicationId '**APPLICATIONID**'
        multiDexEnabled true
        ndk {
            abiFilters **ABIFILTERS**
        }
        versionCode    **VERSIONCODE**
        versionName    '**VERSIONNAME**'
    }
    dexOptions {
        javaMaxHeapSize "4g"
    }

    lintOptions {
        abortOnError false
    }

    aaptOptions {
        noCompress '.unity3d', '.ress', '.resource', '.obb'**STREAMING_ASSETS**
    }

**SIGN**
    buildTypes {
          debug {
            minifyEnabled **MINIFY_DEBUG**
            // 삭제 하지 않으면 에러 발생 
            useProguard **PROGUARD_DEBUG**      // 2018.2 수정
            proguardFiles getDefaultProguardFile('proguard-android.txt'), 'proguard-unity.txt'**USER_PROGUARD**
              jniDebuggable true
          }
          release {
            minifyEnabled **MINIFY_RELEASE**
            // 삭제 하지 않으면 에러 발생 
            useProguard **PROGUARD_RELEASE**     // 2018.2 수정
              proguardFiles getDefaultProguardFile('proguard-android.txt'), 'proguard-unity.txt'**USER_PROGUARD**
              **SIGNCONFIG**
          }
    }
**PACKAGING_OPTIONS**
}


**SOURCE_BUILD_SETUP**

필요 하다면 자신의 multidex 버전 확인
C:\Users\User\AppData\Local\Android\Sdk\extras\android\m2repository\com\android\support\multidex
  1. AndoidManidest.xml파일에 MultiDexApplication추가
    android:name="android.support.multidex.MultiDexApplication"
<application android:allowBackup="true" android:icon="@drawable/app_icon" android:label="@string/app_name" android:theme="@style/UnityThemeSelector" android:debuggable="false" android:isGame="false"
android:  -


추가 - 2019.07.25
- -https://today7e.blogspot.com/2019/07/unity-android-comandroidbuildapitransfo.html

Android Resolver 1.2.122 사용시 
mainTemplate.gradle이 아래와 같이 android.useAndroidX" true값이 들어가 있으면 빌드시 에러가 발생한다.
// Android Resolver Repos Start
([rootProject] + (rootProject.subprojects as List)).each {
    ext {
        it.setProperty("android.useAndroidX", true)
        it.setProperty("android.enableJetifier", true)
    }
}


그럴 경우 AndoidManidest.xml파일에 MultiDexApplication추가
  android:name="androidx.multidex.MultiDexApplication"

[Unity Android] Build-in class shrinker and multidex are not supported yet.

[Unity Android] Build-in class shrinker and multidex are not supported yet.

Multidex 64K문제로 빌드중  아래과 같은 에러가 발생
Error:Build-in class shrinker and multidex are not supported yet.

build-in class shrinker 와 multidex는 동시 사용할 수 없다는 이야기인데 Multidex를 사용하면서 mainTemplate.gradle의 기본값에서 useProguard 설정을 불러와서 그렇다.
useProguard 값 자체를 불러오면 에러가 발생

해결책
mainTemplate.gradle에서 아래 항목을 지워주면 된다.
useProguard **PROGUARD_DEBUG**"
useProguard **PROGUARD_RELEASE**

Unity 2018.2에서 수정됨

[Unity IOS] Plug SDK - dyld: Library not loaded: @rpath/kaleidocore.dylib

[Unity IOS] Plug SDK - dyld: Library not loaded: @rpath/kaleidocore.dylib

XCode 빌드 후 ipa 파일을 넣을때 에러가 난다.(빌드 에러도 발생)
dyld: Library not loaded: @rpath/kaleidocore.dylib

해당(kaleidocore) 라이브러리를 로드하지 못해 나오는 문제이다.

라이브러리가 있는지 검색하고 없다면 해당 라이브러리를 추가해 주면된다.
  1. XCode에서 Link Binary With Libraries에 해당 라이브러리를 검색해서 있으면 추가 해주면 되지만 없다면
  1. Unity 에서 해당 라이브러리를 검색해서(보통 Plugins/iOS 폴더나 추가한 SDK 아래에 있다.) iOS를 선택

3. XCode에서 General -> Embedded Binaries -> "+" 선택 -> 해당 라이브러리 선택
빌드 하면 해당 오류 해결!


하지만 모든 해결 방법을 찾기 전에 가장 중요한 XCode "프로젝트 클린 후 빌드는 필수!"
프로젝트 클린(Product / Clean)
- 단축키 : command + shift + k


2018년 6월 21일 목요일

[Unity Android] Execution failed for task ':transformClassesWithJarMergingForRelease'.

Untiy Android SDK 추가 Build

Unity에 Google PlaySevice를 먼저 설치 후 Vungle SDK를 추가 빌드 중 에러가 발생했다.

Execution failed for task ':transformClassesWithJarMergingForRelease'.
> com.android.build.api.transform.TransformException: java.util.zip.ZipException: duplicate entry: com/google/gson/annotations/Expose.class

원인 : "annotation" SDK가 두개 있어서 그렇다.

해결 : 검색창에 annotation, gson SDK 검색 후 Vungle 쪽 SDK를 삭제해 주면된다.